How to Move a WordPress Site from Localhost to a Live Server
It’s common practice for WordPress developers to create websites on a localhost, which is a local server hosted on their personal computer or laptop. Developing websites locally has a lot of advantages over a live server, but once site development is complete, it needs to be moved to a live website and made publicly accessible.
If you’re relatively new to website development, moving a WordPress website from localhost to a live website will require a bit of extra learning. The process can be quite involved and take some time if you do it manually.
While a plugin is the easiest solution for migration, you may run into some issues if your site is particularly large or if there are any conflicts between the local and live environments. So, in some cases, a manual migration is still the best option.
Five reasons to develop your WordPress site on a localhost
If migrating a WordPress website from a localhost is time consuming and prone to error, why shouldn’t you just develop on a live server from the start?
Here are the advantages of developing on localhost:
- It’s faster. Developing locally is fast as there’s no need to push files to the live server. Instead, you can work directly with the files you need.
- It’s safer. You can easily experiment or carry out updates locally to check for any errors or incompatibilities. Because you aren’t using an internet connection to develop, you’ll be safe from hacking attempts due to any vulnerabilities in plugins or themes you may be using.
- You don’t need to be connected to the internet. Taking a flight? Working from a location with slow or unreliable internet? Local development is perfect in this context.
- It saves server resources. Anything you do on your local server won’t affect your live server.
- It reduces cost. Depending on the type of website you’re building, development could take weeks or months. If you build your site on a live server, you (or your client) will be paying for hosting costs that entire time. Most local development environments are free to use, which can save hundreds or thousands of dollars over the course of development.
Important: Even when working locally, you should take backups and use version control to avoid losing your work.
WordPress development tools for localhost
There are a few different approaches to developing locally. The easiest method is to use an application that includes all of the components needed to run WordPress (server, database, and PHP support).
Local development tools for Linux, Mac, and Windows
- Local. This local development tool is specifically designed for WordPress. It has some great features to assist with development like support for WordPress command-line interface (WP-CLI) and multiple versions of PHP, MySQL, and Apache/NGINX. It also has the option to send a ‘live link’ to clients so they can access your local site for a brief period of time.
- DevKinsta. DevKinsta is similar to Local, but is a slightly less mature product. It’s definitely worth using if you host with Kinsta.
- Lando. Lando is less beginner-friendly, but is a highly-customizable local development environment which allows you to closely match your live server configuration.
- XAMPP. XAMPP is a long-standing, general-purpose, local PHP development stack.
Local development tools for Mac and Windows
- ServerPress. ServerPress is designed for local WordPress website development. One of its unique features includes the ability to migrate your local site to a live server (if you use the premium version of the software).
Local development tools for Windows
- Laragon. Laragon is an extremely lightweight, general purpose local PHP development stack.
If you’re new to local development, then Local might be your best choice, as it strikes the right balance between ease of use and customization while having some great WordPress-specific features.
Migrate your WordPress site from localhost to a live server
There are a few different ways to move a WordPress site from your localhost to a live server. This article addresses two of the most common methods — manual migration and using a migration plugin.
Some of the aspects of the migration process may differ depending on the operating system, local development environment, live host, and plugin that you’re using. The steps should be broadly similar, though.
Before you start
Whichever migration process you use, there are some key things you’ll need to set up and information you’ll need to have on-hand:
- Web hosting that meets WordPress requirements. If your hosting does not meet WordPress requirements, you may still be able to migrate your site, but you may create security vulnerabilities.
- A domain name linked to your web host. If your domain registrar is different than your hosting company, you’ll need to connect your domain to your host. You can do this by changing the domain nameserver to that of your hosting company or the DNS A record to your live server’s IP address.
- Login details for your hosting control panel. These are usually the same as the login information for your hosting account. If you’re unsure, check with your hosting provider.
- Secure file transfer protocol (SFTP) details for your hosting account. These are usually found in your hosting control panel. If you’re unsure where to find them, ask your host’s support team. These are the details you’ll need:
- Host (your live server’s IP address)
- Username
- Password
- Port number
You’ll also need an SFTP application to transfer the files from your localhost to your server. Here are some free and premium SFTP tools:
| Application | System | Free or Premium |
| WinSCP | Windows | Free |
| Filezilla | Windows, Mac, Linux | Free and premium options |
| Cyberduck | Windows, Mac | Free |
| Transmit | Mac | Premium |
This tutorial will use Filezilla, but most SFTP clients work fundamentally in the same way.
How to manually migrate your WordPress website from localhost to a live server
The following instructions for manually moving your WordPress website from localhost to a live website are based on a host that uses cPanel. You should still be able to follow along if your host uses an alternative like Plesk or their own control panel.
1. Make a backup of your local site
The manual method of migrating your website from localhost to a live server can be error-prone and involves using quite a few tools. Make sure to take a backup before you begin the migration process and at every step along the way, just in case anything goes wrong.
2. Copy your files from localhost to your live server
1. Log in to your web server using your SFTP client of choice. This is where you’ll enter the SFTP credentials provided by your host.

Note: you may get a ‘host key unknown’ error. This is not unusual for some SFTP clients that use trust on first use (TOFU) authentication. Just click ‘OK’ and proceed if you’re sure the host key is correct. You can even check ‘Always trust this host, add this key to the cache’ if you plan on logging into the site via SFTP again.

2. Navigate to your website files on your local computer. With most SFTP software, your local files appear in the left pane, and your server files in the right. From your localhost, you should have access to the files that make up your WordPress site. If you can see a wp-config.php file alongside directories like wp-content, then you’re in the right place.
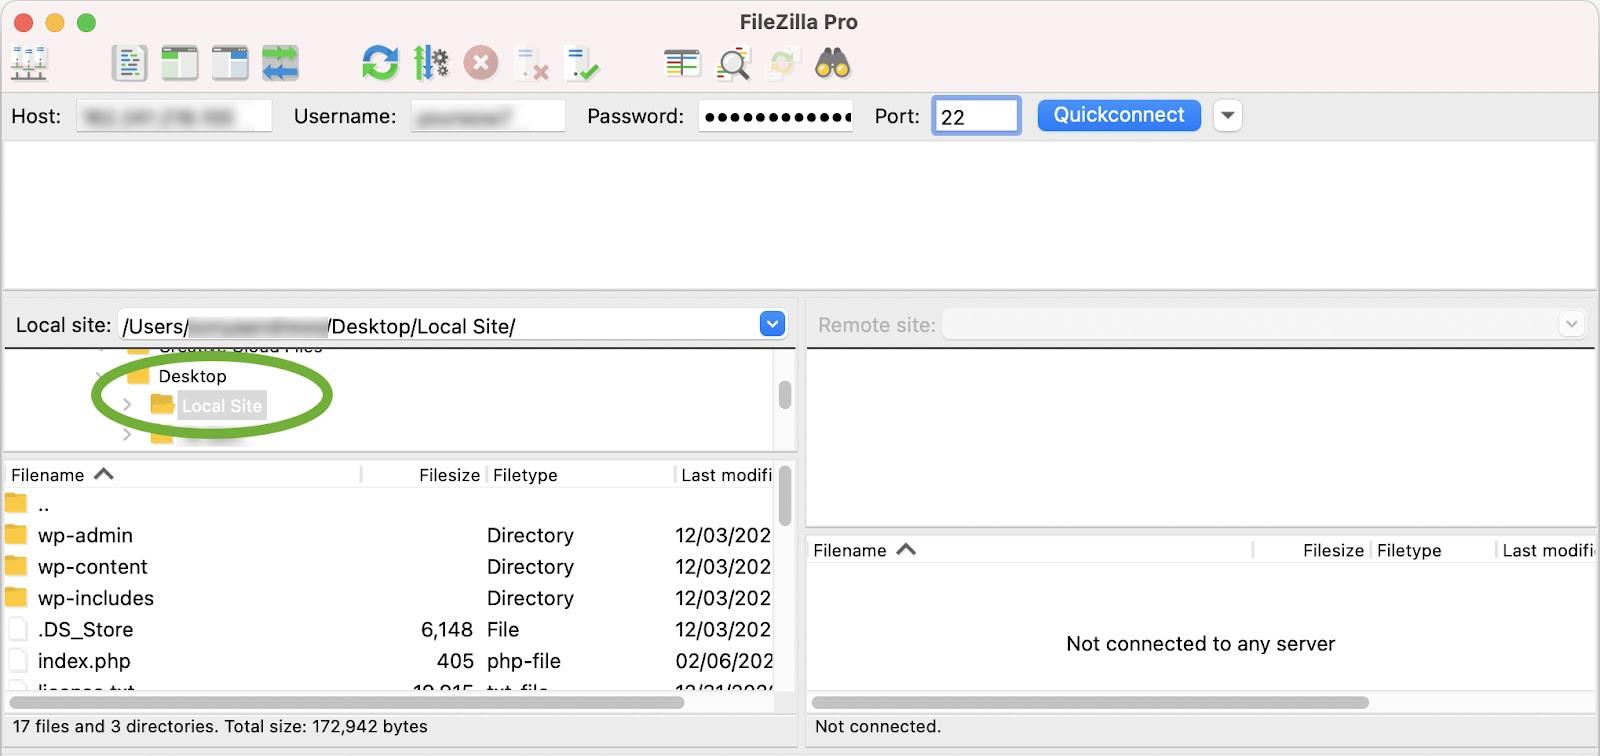
3. Navigate to the public directory on your web server (right pane). This is typically a folder called ‘public_html’ or ‘www.’ This does vary from host to host, so check with them if you’re unsure. If you’re hosting your site in a subfolder, you’ll want to navigate to that subfolder.

4. Select all of the local files from the left pane and drag them to your web server in the right pane. This will take a while depending on the number of plugins, themes, and files you have, but you should be able to see the progress in your SFTP application.

3. Import the data from your local database to your live database
Even though you’ve moved your files from your local server to the live server, you’ll need to connect to a database in order to view your live site. At this point, when you open your browser and try to navigate to the public URL of your web server, you should see an error like ‘error establishing database connection.’ This tells you two things:
- The WordPress files have been uploaded.
- The site needs to be connected to a database.
Export the database from localhost
An essential part of your WordPress installation is the database. This is where all of your website data is stored, like post content, settings, and meta fields.
Typically, you would export your database using phpMyAdmin, which is part of almost all local development environments. Some local environments, like Local, use Adminer as an alternative, but web hosts almost always use phpMyAdmin.
In phpMyAdmin:
- Select your database.
- Click the ‘Export’ tab.
- Select ‘Quick’ as the export method, choose ‘SQL’ as the file type, and click ‘Go.’
In Adminer:
- Select your database.
- Click ‘Export’ from the menu.
- Select ‘SQL’ as the output, then click ‘export’
This will download a .sql file to your computer. Take a note of where this is saved, as you’ll need to import this on your web server.
Create a database on your live server
To upload your database, you’ll first need to create a new, blank database on the web server.
1. In your hosting control panel, go to the ‘Databases’ section and click ‘MySQL databases.’

2. Create a new database. In this case, the database is called ‘tutorial_mydb.’

3. Create a database user. Scroll down to the ‘MySQL Users’ section and create a new user. As always, you should have a unique and strong password.

4. Add the database to the user and assign permissions. To do this, scroll down to the ‘Add user to database’ section, select the user and database that you just created, and click ‘Add.’

5. Assign all privileges to the user account and click ‘Make Changes.’

You have now successfully created a blank database that you can import your data into.
Edit your wp‑config.php file
The wp-config.php file is a core WordPress file that contains important information about your database. WordPress uses this file to connect to the database in order to retrieve and store vital information like post content, post meta, users, and various settings. You’ll need to update the localhost wp-config.php file with the live server database information so that your live site can communicate with your database.
1. On your localhost, take a copy of your wp-config.php file and open it in a text editor of your choice, like VS Code or Notepad++.
2. Go to the mySQL section of the config file and replace your localhost database details with those you just created.
1 2 3 4 5 6 7 8 9 10 11 12 | // ** MySQL settings - You can get this info from your web host ** ///** The name of the database for WordPress */define( 'DB_NAME', 'yournewdatabasename');/** MySQL database username */define( 'DB_USER', 'yournewdatabaseuser');/** MySQL database password */define( 'DB_PASSWORD', 'yournewdatabasepassword');/** MySQL hostname */define( 'DB_HOST', 'localhost' ); |
Despite moving the website to a live server, the DB_HOST will still usually be ‘localhost’, although this does change on some hosts, so be sure to check.
Some wp-config.php files also contain the following lines:
1 2 | define(‘WP_SITEURL’, ‘http://localhost.test’);define(‘WP_HOME’, ‘http://localhost.test’); |
If these lines are present, then you’ll need to change them to your server URL, e.g. https://yourdomain.com.
3. Save this file and overwrite the one you uploaded to your web server by dragging and dropping it using your SFTP client.

Import your data
Now that you have a blank database and have pointed the wp-config.php file, it’s time to import the data that you exported earlier.
- Head to phpMyAdmin on your web server. In cPanel, you’ll find this under ‘Databases.’
- Select your newly created database, then click the ‘import’ tab.
- Click ‘Choose File’ and find the sql file that you exported earlier.
- Click ‘Go’ to begin the import process. It may take a little while depending on the size of the database. Once done, you should see all your database tables on the left, like wp_posts, wp_postmeta, and wp_options, etc.
Change the site URLs in your database
Now that your data has been imported, you’ll need to ensure the database contains the new site URL, and not that of your localhost.
1. Open phpMyAdmin and select your database.
2. Click on your WordPress options table. Tables usually appear on the left.

3. Once opened, you should see the first two options. Under the ‘option_name’ column, you’ll see ‘siteurl’ and ‘home.’
4. Double click on the option value under the ‘option_values’ column and change both of these to your new URL. Make sure you don’t include a forward slash (/) at the end.

5. Open your browser and type in your live site’s url with /wp-admin/ at the end (e.g. https://yourwebsite.com/wp-admin/). From here, you should be able to login to your WordPress dashboard. However, you may need to go through a couple more steps to make sure all pages and posts on your site are reachable.
4. Flush your permalinks
Permalinks are the permanent links to pages and posts on your website and their underlying structure. Sometimes your post and page URLs may not work on your newly migrated site unless you flush your permalinks first. You can do it by following these steps:
- Go to your WordPress dashboard and log in.
- Go to Settings → Permalinks.
- Click ‘Save Changes.’
5. Search and replace localhost URLs in your database
Sometimes when creating your website, your localhost URL may also get stored in the database in a variety of places, which could cause broken links on your web server. There are two methods to resolve this problem:
- Use an SQL query (advanced).
- Use a plugin.
Before doing anything to your database, you should always create a backup.
Search and replace using an SQL query
This method is far more risky than using a plugin, but if you’re confident with SQL, then it’s quick, easy, and doesn’t require you to install any plugins.
1. Log into phpMyAdmin on your web server, select your database, then click the ‘SQL’ tab.
2. Copy and paste the following query parameters into the SQL query field:
1 | UPDATE wp_posts SET post_content = replace(post_content, 'http://localhost.test', 'https://webserver.com'); UPDATE wp_postmeta SET meta_value = replace(meta_value,'http://localhost.test','https://webserver.com'); |
There are some values in this query that you’ll need to modify:
- The ‘wp_posts’ and ‘wp_postmeta’ names may be different depending on what your database prefix is. You can see this in the left pane of phpMyAdmin.
- The URLs will need to be changed to your real values.

Once you’ve modified the query, check it to make sure the values are correct before clicking ‘Simulate query.’ ‘Simulate query’ will perform a test to see how many values will change if you actually run it. If there’s an error at this point, double-check your values.

Once you’ve run the simulation, you should see some ‘matched row’ figures. This is how many instances will be replaced. If this is zero, then you may have used an incorrect URL or there’s genuinely nothing to replace. If your URL is correct and no rows were matched, you don’t need to make any further changes.
3. If your simulated query shows a number of matched rows, then close the ‘Simulate query’ dialogue box and click ‘Go’ to run the actual SQL query. You should now be able to navigate to your live website without errors.
Search and replace using a plugin
This method is slightly easier and less error prone if you’ve not used SQL before. This example uses the Better Search Replace plugin.
In your WordPress dashboard:
- Go to Plugins → Add New.
- Search for ‘Better Search Replace’.
- Click ‘Install Now’ on the Better Search Replace plugin.
- Click ‘Activate.’
- In your WordPress dashboard, go to Tools → Better Search Replace.
- Fill the ‘Search for’ field with your localhost URL (e.g. http://localhost.test).
- Fill the ‘Replace with’ field with your web server URL (e.g. https://yourwordpresswebsite.org).
- Select the database tables that you want to perform the search/replace on. Usually it’s only necessary to apply this to the wp_posts and wp_postmeta tables.
- Keep ‘Case-insensitive’ and ‘Replace GUIDs’ unchecked.
- Check ‘Run as dry run?.’
- Click ‘Run Search/Replace.’ The dry run means that this will make no changes, but will show you the number of potential changes.
- Check for changes. At this point, you should see a number of changes. If you don’t, then you may need to double-check your URLs. If your URLs are correct and there’s still nothing to change, then you don’t need to proceed and can delete the plugin.
- If there’s a number of changes to make, uncheck the ‘Run as dry run?’ option and click ‘Run Search/Replace.’
- Deactivate and uninstall Better Search Replace. Once this has completed and you’ve checked that the site is working correctly (particularly check images with your localhost turned off), then you can deactivate and uninstall the plugin.
You have now completed your manual migration!
Migrating from localhost to a live server using a plugin
When migrating your WordPress website with a plugin, if you have a large website or there are issues between server environments, the migration may fail. The plugin may not give you any feedback as to why. In those instances, manual migration may still be necessary.
However, for the majority of websites, migrating with a plugin is a lot easier, less time consuming, and produces fewer errors. This section addresses migrating your site using the Duplicator plugin, but other options include DesktopServer and Transferito. The process should be similar, whichever plugin you use.
1. Create a package
1. In your WordPress dashboard, go to Plugins → Add New.
2. Search for ‘Duplicator.’ Click Install → Activate.
3. Find ‘Duplicator’ in your WordPress admin menu. Click on ‘Packages’ to be taken to the Packages screen.
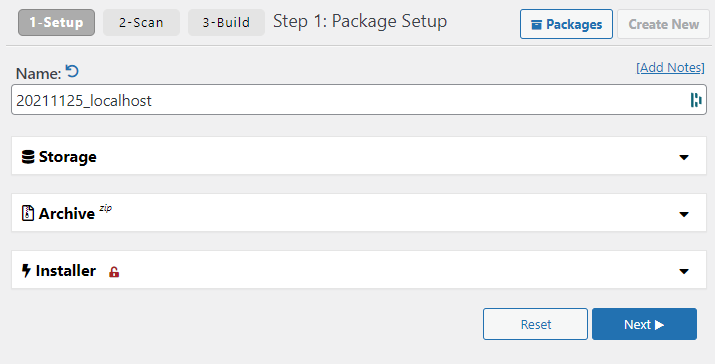
4. Create a new package. You should be presented with a message that says ‘No packages found.’ Click ‘Create New’ in the upper right corner of the screen.
5. Check package settings. At this point, there are some options you can change, but the defaults will be fine the majority of the time. Click ‘next’.
Review the test scan and make changes if necessary. The plugin will now scan your site to make sure everything is ok before taking the backup. The checks here try to ensure that the package will be compatible with most hosting environments. Once complete, you’ll see the results of these tests.
Your test results should all be ‘good’ — the exception to this being size checks. It’s likely you may get a ‘notice’ on size checks if you have a fairly large website. Compressing larger sites on some budget hosts may cause timeouts, although this usually won’t be an issue. You can still proceed despite this notice.
If anything fails, simply click on the item to get more details as well as suggestions on how to rectify the issue before proceeding.

Build your package. Once your test results are ‘good’ (size check notice aside), hit the ‘Build’ button. This may take a while depending on the size of your site, but be patient and keep the browser window open until it completes.
Download your files. Once complete, you’ll need to download two files: a ZIP containing the website files and an installer.php file.

2. Create a database on your live server
To install your package, you’ll need to create a new, blank database on your web server. Log in to your hosting control panel, go to the ‘MySQL databases’ section, and create a new database.
Create a database on your live server
To upload your database, you’ll first need to create a new, blank database on the web server.
1. In your hosting control panel, go to the ‘Databases’ section and click ‘MySQL Databases.’

2. Create a new database. In this case, the database is called ‘tutorial_mydb.’

3. Create a user for the database. Scroll down to the ‘MySQL Users’ section and create a new user. As always, you should have a unique and strong password for your database user.

4. Add the database to the user and assign permissions. To do this, scroll down to the ‘Add user to database’ section, select the user and database that you just created, and click ‘Add.’

5. Assign all privileges to the user account and click ‘make changes.’

3. Copy your files from localhost to your live server
To copy your files over from your localhost to your live environment, you’ll need to place the Duplicator package and installer.php file on the web server.
For this part, you’ll need an SFTP client and your SFTP login details. Be sure to ask your web host if you aren’t sure what these are. Alternatively, as you’re only uploading two files, you could upload them through your hosting control panel file explorer if it has one.
1. Log in to your web server using your SFTP client of choice.

Note: you may get a ‘host key unknown’ error. This is not unusual for some SFTP clients that use trust on first use (TOFU) authentication. Just click ‘OK’ and proceed if you’re sure the host key is correct. You can even check ‘Always trust this host, add this key to the cache’ if you plan on logging into the site via SFTP again.

2. Navigate to where you saved your Duplicator package and installer.php files on your local computer. In most SFTP software, your local files appear in the left pane, and your server files in the right.

3. Navigate to the public directory on your web server (right pane). This is typically a folder called ‘public_html’ or ‘www.’ This does vary from host to host, so check with them if you’re unsure. If you’re hosting your site in a subfolder, you’ll want to navigate to that subfolder.

6. Select your duplicator package and installer.php files and drag them to your web server (moving from left to right). This may take a little time depending on the size of your Duplicator package.

4. Install your Duplicator package
1. In your browser, go to https://yoururl.com/installer.php (replacing everything before ‘installer.php’ with your real URL).
2. Step 1 of 4: Deployment. At the above URL, you should now see the first step of the deployment process. This step checks that your hosting is suitable for Duplicator to install your package. If you get any failures at this stage, speak with your web hosting provider. There are some options here, but most of the time, the defaults will be fine. If everything passes, click ‘Next’.
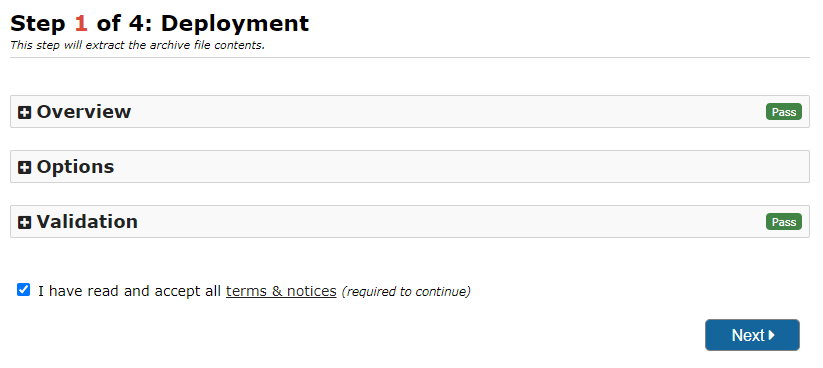
Your Duplicator package will now be extracted. This can take a little while depending on its size.
3. Step 2 of 4: Install Database. After the package has been extracted, you’ll be asked for your database information. Input the details from the database you created earlier. The default is to remove any information that’s already in the database, which is not a problem if you’ve created a blank database as recommended.

Your host should likely still be set to ‘localhost’ despite this being a live web server. This does sometimes change between hosting providers, so if you run into any problems, be sure to contact yours.
Once again, there are some options here, but in most cases, the defaults are going to be perfect. Click ‘Test Database.’
If this passes, then it means that Duplicator can connect to your database successfully. Click ‘Next.’ If you have any errors here, then double check the details you’ve entered and get in touch with your hosting provider if you’ve unable to resolve it yourself.

Your database will now be installed. This process is usually a lot quicker than extracting the package, but may still take a few minutes depending on the size of your database.
4. Step 3 of 4: Update Data. Now that your database has been installed, you will be asked for your website title, new URL, and the path to where it should be installed on the server. Duplicator attempts to automatically fill out these details, but it’s worth double-checking that they’re correct. Once you’ve checked that the information is correct, click ‘Next.’

5. Step 4 of 4: Test Site. Your website should now be live. You can click the ‘Admin Login’ link. Be sure to check ‘Auto delete installer files after login.’

6. Delete installer files. Once you’ve logged in to your WordPress dashboard, your installer files will automatically be deleted if you checked the ‘Auto delete installer files after login’ checkbox. If you forgot to check it, you can still delete the files manually using SFTP. It’s good practice to deactivate and remove the Duplicator plugin if you aren’t planning on using it anymore in the short term. If you ever need it again, you can always reinstall it.
5. Flush your permalinks
Permalinks are the permanent links to pages and posts on your website and their underlying structure. Sometimes your post/page URLs will not work on your newly migrated site unless you flush your permalinks first. This is a simple process:
- Go to your WordPress dashboard and log in.
- Go to Settings → Permalinks.
- Click ‘Save Changes.’
Test your live site for errors
Regardless of the method you use to move your website from localhost to live, you should test it to ensure that nothing has gone wrong along the way. Here are a few things to check after moving your site from localhost to live:
Front-end:
- Does the front end of the website look as expected?
- Do all links work?
- Do all interactive elements function correctly (e.g. sliders, accordions, pop-ups)?
- Can you submit any forms? Do these forms get received?
WordPress dashboard:
- Do all admin pages load correctly?
- Can you add and edit posts, pages, and any custom post types?
- Can your website be indexed by search engines? Go to Settings→ Reading and ensure ‘Discourage search engines from indexing this site’ is unchecked.
- Do your plugin and theme pages work?
- Can you install new plugins?
Backups
Now that your site is live, you should make sure to set up regular backups. You never know when something could go wrong thanks to a hack, update, or change. Jetpack Backup makes this easy.
With Jetpack Backup, you can save all your files, including your database. Redundant copies are made on multiple servers and stored off-site, in the cloud, eliminating extra load from your server. Jetpack Backup is tested to ensure there are no conflicts with major plugins or hosts, so it’s safe to use on just about any website. Learn more about WordPress website backups.
Check your speed
You wouldn’t use a content delivery network (CDN) or caching on your localhost, but once your site is live, you’ll likely see a difference in site speed performance. Implementing some type of caching and/or a CDN is essential for speeding up load times on most websites.
Jetpack CDN can cover all of your speed needs. Best of all — it’s free. It optimizes images and static files like CSS and JavaScript and delivers them from Jetpack’s global network of servers. There’s no file limit and it also works well with Jetpack’s ad-free video hosting service, VideoPress.
Migrate WordPress from localhost to live server with confidence
We’ve taken you through two methods of moving your WordPress website from localhost to a live server — manual migration and migration using a plugin. While the manual method can seem quite challenging, especially for new developers, the plugin method makes migration easy in comparison.
For most people, using a migration plugin is going to be the quickest, easiest, and least error-prone way to get a website online. If the plugin method doesn’t work for you, then you always have the fall-back option of manually moving your website. Whichever migration method you choose, you should be sure to make backups every step of the way.


Comments
Post a Comment